Performance Optimization
The Object Pool Pattern ♻️
CSCI 3213 - Game Programming
Reuse, don't recreate - the key to smooth performance!
Today's Content
📚 Based on Chapter 8
Improving Performance with the Object Pool Pattern
From: Game Development Patterns with Unity 2021 (2nd Edition)
By David Baron
Today's Learning Objectives
What We'll Master
- 🎯 Understand garbage collection performance issues
- 🎯 Learn Object Pool Pattern structure
- 🎯 Implement Unity's ObjectPool<T> system
- 🎯 Build a drone spawning pool
- 🎯 Measure performance improvements
Goal: Create a high-performance drone spawner that reuses objects instead of constantly creating/destroying them.
Developer's Note: "Never Panic Early"
⚠️ What to Expect During Implementation
As we implement this pattern, we'll be creating multiple files in a specific order. You will see errors in Unity and your IDE until all files are complete.
How to Handle Development Errors
- Don't Ignore: Note the errors - they're telling you something
- Don't Panic: These are expected until all files are created
- Stay Calm: Follow the implementation order and errors will resolve
As Apollo 13's Fred Haise said: "Never Panic Early"
This is a critical skill for software development. Note problems, but stay focused on the implementation path.
The Problem: Instantiate/Destroy Overhead
❌ Without Object Pooling
Problems: GC SPIKES, memory allocation overhead, framerate stutters, poor performance
Understanding Garbage Collection
What Happens When You Instantiate/Destroy
• Allocates memory on the heap
• Creates GameObject, components, and scripts
• Registers in Unity's scene hierarchy
• Cost: Expensive!
• Marks object for deletion
• Leaves memory as "garbage"
• Doesn't immediately free memory
• Cost: Creates garbage!
• Unity pauses your game periodically
• Scans for unused memory
• Frees garbage back to system
• Cost: FRAME RATE STUTTER!
What is the Object Pool Pattern?
Object Pool Pattern
A creational pattern that manages a set of reusable objects, handing them out when needed and reclaiming them when done, instead of creating and destroying objects repeatedly.
✅ Key Concept
Recycle instead of recreate! Create objects once, disable them when not in use, re-enable when needed again.
Object Pool: Benefits & Drawbacks
✅ Benefits
- Performance: Eliminates GC spikes
- Memory: Predictable memory usage
- Framerate: Consistent, smooth performance
- Mobile-Friendly: Critical for mobile games
- Control: Set max pool size
⚠️ Drawbacks
- Complexity: More code to manage
- Memory Trade-off: Holds objects in memory
- Reset Logic: Must clean object state
- Over-pooling: Can waste memory if oversized
- Debugging: Objects never fully destroyed
Object Pool Lifecycle
Step-by-Step Process
- Initialization: Pre-create a collection of inactive objects
- Get: Activate an object from the pool (or create if pool empty)
- Use: Object performs its function (bullet flies, drone patrols)
- Release: Deactivate object and return to pool
- Repeat: Same object gets reused many times!
Building a Simple Object Pool
Understanding the Mechanics (We'll delete this next!)
📁 File Structure Note - INSTRUCTIONAL EXAMPLE
Create a new file: Assets/Scripts/Testing/SimpleObjectPool.cs
This is a learning exercise to understand pool mechanics - we'll delete this later!
⚠️ Temporary code for understanding only - not for production use.
How It Works
Start() - Pre-creates all objects at startup. Each one is Instantiated once, then immediately deactivated and stored in the list.
SetActive(false) - Unity's way to "hide" an object. It stops rendering, physics, and Update() calls but the object stays in memory ready to reuse.
Get() - Scans the list for the first inactive object. Linear search (O(n)) - simple but slow for large pools.
!obj.activeInHierarchy - Checks if the object is currently inactive (available). The ! means "not active" = available for reuse.
Release() - Simply deactivates the object. No Destroy() call - the object returns to the pool for reuse.
This works but has limitations: fixed size, no callbacks, no type safety. Unity's ObjectPool<T> solves all of these!
Unity's Native ObjectPool<T>
Built-In Pool System
Unity includes UnityEngine.Pool.ObjectPool<T>
- a production-ready pooling system!
- ✓ Type-Safe: Generic implementation
- ✓ Callbacks: OnCreate, OnGet, OnRelease, OnDestroy
- ✓ Flexible: Works with any object type
- ✓ Tested: Battle-tested by Unity engineers
- ✓ Thread-Safe Options: For advanced scenarios
Our Approach: Use Unity's built-in system - no need to reinvent the wheel!
Object Pool Pattern Structure
┌─────────────────────────┐
│   DroneSpawner          │  ← Pool Manager
│─────────────────────────│
│ - pool: ObjectPool<T>  │
│ - dronePrefab           │
│ + SpawnDrone()          │
│ + ReleaseDrone()        │
└────────┬────────────────┘
         │ manages
         ▼
┌─────────────────────────┐         ┌──────────────────┐
│  ObjectPool<Drone>      │────────▶│      Drone       │  ← Pooled Object
│─────────────────────────│         │──────────────────│
│ + Get()                 │         │ + OnSpawn()      │
│ + Release(drone)        │         │ + OnDespawn()    │
│ + Clear()               │         │ + Patrol()       │
└─────────────────────────┘         └──────────────────┘
         │
         │ callbacks
         ▼
┌─────────────────────────┐
│   Pool Callbacks        │
│─────────────────────────│
│ + OnCreateDrone()       │  ← Create new instance
│ + OnGetDrone()          │  ← Activate from pool
│ + OnReleaseDrone()      │  ← Deactivate to pool
│ + OnDestroyDrone()      │  ← Clean up on Clear()
└─────────────────────────┘
Implementation Step 1: Drone Object
📁 File Structure Note - PRODUCTION CODE
Create a new file: Assets/Scripts/Enemies/Drone.cs
Enemy drone object that works with Unity's ObjectPool.
⚠️ This code goes into your Unity project for Blade Racer.
Drone Lifecycle
Public fields - speed, maxHeight, wobbleAmount are editable in the Unity Inspector. Tweak without changing code!
OnSpawn() - Called by the pool's OnGet callback. Activates the GameObject so it becomes visible and starts running Update().
OnDespawn() - Called by the pool's OnRelease callback. Deactivates the GameObject - it stops rendering and updating but stays in memory.
ReleaseDrone(this) - The drone releases itself back to the pool when it reaches max height. this refers to the current Drone instance.
Notice: no Destroy() call anywhere! The drone is deactivated and recycled, never destroyed.
Implementation Step 2: Spawner Setup
📁 File Structure Note - PRODUCTION CODE
Create a new file: Assets/Scripts/Spawners/DroneSpawner.cs
Spawner that manages drone pooling using Unity's ObjectPool.
⚠️ This code goes into your Unity project for Blade Racer.
Key Concepts
using UnityEngine.Pool - Required import to access Unity's built-in ObjectPool<T> class
Singleton - Instance lets any script access the spawner via DroneSpawner.Instance without needing a reference.
ObjectPool<Drone> - Generic pool typed to Drone. Ensures type safety - you can only pool/retrieve Drone objects.
Constructor params:
- createFunc - How to make a new drone
- actionOnGet - What to do when retrieving
- actionOnRelease - What to do when returning
- actionOnDestroy - How to clean up
- collectionCheck - Warns if you release twice
- maxSize - Cap to prevent memory bloat
Implementation Step 3: Pool Callbacks
Four Pool Callbacks
Pool Empty + Get() called
        │
        ▼
┌──────────────────┐
│  CreateDrone()   │ ← Instantiate new
└──────────────────┘

_pool.Get()
        │
        ▼
┌──────────────────┐
│  OnGetDrone()    │ ← Activate
└──────────────────┘

_pool.Release()
        │
        ▼
┌──────────────────┐
│ OnReleaseDrone() │ ← Deactivate
└──────────────────┘

_pool.Clear() or maxSize exceeded
        │
        ▼
┌──────────────────┐
│ OnDestroyDrone() │ ← Destroy
└──────────────────┘
Debug.Log in each callback lets you trace pool behavior in the Console during testing.
Quick Note: GameObject vs gameObject
Understanding Unity's Naming Patterns
Notice the Capitalization?
In the previous slide, you saw: drone.gameObject.SetActive(false)
Why gameObject (lowercase g) instead of GameObject (capital G)?
GameObject (Capital G)
- What it is: A class type
- Used for: Declaring variables, type references
- Examples:
GameObject obj;Instantiate(prefab)returns GameObjectnew GameObject("MyObject")
gameObject (lowercase g)
- What it is: A property on MonoBehaviour
- Used for: Accessing the GameObject this script is attached to
- Examples:
gameObject.SetActive(false)gameObject.name = "Drone"drone.gameObject.transform
The Pattern in Unity
Unity follows this pattern for built-in types:
- Transform (class) vs transform (property on Component)
- Rigidbody (class) vs rigidbody (cached component reference)
- Renderer (class) vs renderer (cached component reference)
drone.gameObject, you're accessing the GameObject that the Drone component is attached to!
Implementation Step 4: Public API
Public API Methods
SpawnDrone() - Wraps _pool.Get() and sets the spawn position. Callers never touch the pool directly.
ReleaseDrone() - Wraps _pool.Release(). The Drone calls this on itself when it reaches max height.
Statistics - CountActive and CountInactive are built-in ObjectPool properties. Useful for debugging and GUI.
OnDestroy() - Unity lifecycle method called when the GameObject is destroyed. _pool.Clear() triggers OnDestroyDrone for each pooled object.
Encapsulation: other scripts only call SpawnDrone/ReleaseDrone, never interact with ObjectPool<T> directly.
TestPanel: Object Pool Fields & Input
📁 Update TestPanel.cs
Add these fields and keyboard shortcuts to your existing TestPanel.cs.
Code Breakdown
New Fields: Store spawner reference, auto-spawn state, and timing config. _poolExpanded controls the collapsible GUI section.
FindFirstObjectByType<DroneSpawner>() - Finds the spawner in the scene at startup. Safer than using the Singleton in Start() since execution order isn't guaranteed.
G key: Spawns one drone at a random position. T key: Toggles continuous auto-spawning on/off (every 0.5s).
Auto-spawn timer: The Time.time > _nextSpawnTime cooldown pattern spawns a drone every 0.5 seconds while auto-spawn is toggled on.
_spawner prevents errors if DroneSpawner isn't in the scene.
TestPanel: GUI Section & Keymap
Add DrawObjectPoolSection() and call it from DrawWindow(). Update the keymap.
GUI Section Pattern
Collapsible header: Cyan toggle button expands/collapses the section. Same pattern as the green Command Pattern header.
Spawn + Auto-Spawn buttons: Mirror the keyboard shortcuts (G and T). Button label changes based on auto-spawn state.
Live pool stats: Active and Pooled counts update every frame - watch objects recycle in real-time!
TestPanel Evolution
- Lecture 4: Event Bus section + keymap
- Lecture 5: + Command Pattern section
- Lecture 6: + Object Pool section
- Future: Add sections as needed!
DrawObjectPoolSection() in DrawWindow()!
Critical: Object Reset Logic
⚠️ Always Reset Object State!
When objects are reused, they carry over their previous state. You MUST reset them to clean initial conditions!
📁 File Structure Note - PRODUCTION CODE
Update the OnSpawn() method in: Assets/Scripts/Enemies/Drone.cs
Add this expanded reset logic to ensure proper object state when reused.
⚠️ This code goes into your Unity project for Blade Racer.
Why Check for Null?
GetComponent<Rigidbody>() might return null!
If your drone doesn't have a Rigidbody component attached, trying to access
rb.velocity would crash the game.
Unsafe approach:
rb.velocity = Vector3.zero;
❌ Crashes if rb is null!
Safe approach:
if (rb != null) { rb.velocity = Vector3.zero; }
✅ Safely skips if no Rigidbody
Best practice: Always check for null when using GetComponent!
Testing the Object Pool
Test Setup Steps
- Create new Unity scene
- Create Drone prefab (Cube with Drone script)
- Create empty GameObject "DroneSpawner"
- Attach DroneSpawner script, assign drone prefab
- Verify TestPanel has Object Pool section (added in previous step)
- Run and watch drones spawn/recycle!
What to Observe
- Press T to start auto-spawning (or click in TestPanel)
- Drones rise to max height, then disappear
- Watch console logs: "Created" only appears once per unique drone!
- TestPanel shows live Active/Pooled counts
Performance Comparison
Without Pooling
GC spike every 2 seconds
Frame drops visible
With Pooling
No GC spikes
Smooth 60 FPS
Performance Metrics (100 drones/sec)
Hands-On Implementation 💻
30-Minute Implementation Challenge
Implement the Object Pool Pattern:
- Create Drone MonoBehaviour with OnSpawn/OnDespawn
- Create DroneSpawner with ObjectPool<Drone>
- Implement all four pool callbacks
- Add Object Pool section to TestPanel
- Add pool stats and spawn controls to TestPanel GUI
- Test and verify objects are recycled (check console logs)
Gaming History Moment 🕹️
Golden Age Arcades: Space Invaders (1978)
In 1978, Tomohiro Nishikado created Space Invaders for Taito, and it became the first blockbuster arcade game. Running on extremely limited hardware, the game had to manage dozens of aliens and player bullets on screen simultaneously. With only 8KB of ROM and 1KB of RAM, creating and destroying objects was expensive.
Nishikado's solution? Reuse everything. Bullets weren't created and destroyed - they were recycled! When you fired, the game grabbed an inactive bullet from a fixed pool, activated it, and sent it upward. When it hit an alien or reached the top, it returned to the pool. The game pre-allocated a maximum of 3 player bullets and dozens of alien projectiles at startup, then reused them constantly.
Connection to Object Pool Pattern
Space Invaders pioneered object pooling out of necessity! With such limited memory, the game couldn't afford to allocate and deallocate bullets every frame. Pre-allocating a pool and recycling objects - exactly what we're implementing today - was essential to making the game run smoothly on 1978 hardware. This pattern became fundamental to game development and remains critical for performance even on modern systems!
Determining Pool Size
Key Questions
- What's the maximum concurrent objects?
- What's the typical spawn rate?
- How long does each object "live"?
- What's acceptable memory overhead?
Formula: defaultCapacity = spawnRate × avgLifetime × 1.2
Example: 10 bullets/sec × 3 second lifetime × 1.2 buffer = 36 bullets
Formula: maxSize = defaultCapacity × 2 (or peak concurrent)
Example: 36 default × 2 safety = 72 max bullets
What to Pool in Games
🔫 Projectiles
Bullets, arrows, missiles, lasers
Why: Spawned frequently, short-lived
👾 Enemies
Minions, drones, zombies
Why: Wave-based spawning
💥 VFX
Explosions, impacts, trails
Why: Particle systems are expensive
🎵 Audio Sources
Sound effect players
Why: Many sounds play simultaneously
💎 Pickups
Coins, health, power-ups
Why: Spawn/despawn continuously
📄 UI Elements
Damage numbers, notifications
Why: Instantiate/Destroy is slow
Advanced: Pool Warm-Up
📁 File Structure Note - OPTIONAL ENHANCEMENT
Update the Start() method in: Assets/Scripts/Spawners/DroneSpawner.cs
Add warm-up logic to pre-populate the pool at startup.
⚠️ This is an optional optimization - implement if needed for your game.
Warm-Up Strategy
Why warm up? - The first _pool.Get() triggers CreateDrone() which calls Instantiate(). Warming up moves all that cost to the loading screen instead of mid-gameplay.
_pool.Get() - Triggers CreateDrone callback, creating a real drone instance
_pool.Release(drone) - Immediately returns each drone to the pool as inactive
The pattern - Get all → store in temp list → release all back. After this, the pool has 20 pre-created drones ready to go with zero allocation cost.
Essential for games where the first seconds of gameplay must be perfectly smooth (e.g., wave-based shooters).
Homework Part 2: Performance Comparison
What You'll Build
To prove that object pooling actually improves performance, you'll create two identical scenes — one with pooling, one without — and compare them using Unity's Profiler.
Scene A: No Pooling
- NaiveDrone.cs - Self-destructs with
Destroy() - NaiveSpawner.cs - Creates with
Instantiate() - No reuse — every drone is created and destroyed
Scene B: With Pooling
- Drone.cs - Returns to pool via
ReleaseDrone() - DroneSpawner.cs - Uses
ObjectPool<T> - Objects recycled — created once, reused many times
Non-Pooled Drone: NaiveDrone.cs
📁 File Structure Note - TESTING CODE
Create a new file: Assets/Scripts/Testing/NaiveDrone.cs
A simplified drone that self-destructs — the "old" way, without pooling.
⚠️ This is for your comparison scene only — not for production use.
Pooled vs Non-Pooled
Same movement - Identical speed, height, and wobble logic. The only difference is what happens when the drone reaches max height.
Destroy(gameObject) - Marks the object for deletion. Unity will free its memory later during garbage collection — causing the GC spikes we want to measure.
No pool reference - NaiveDrone doesn't know about DroneSpawner or ObjectPool. It's completely standalone — simpler code, but worse performance.
Pooled Drone:     → pool.Release()  → deactivated
NaiveDrone:       → Destroy()       → garbage collected
This contrast is exactly what the Profiler will reveal!
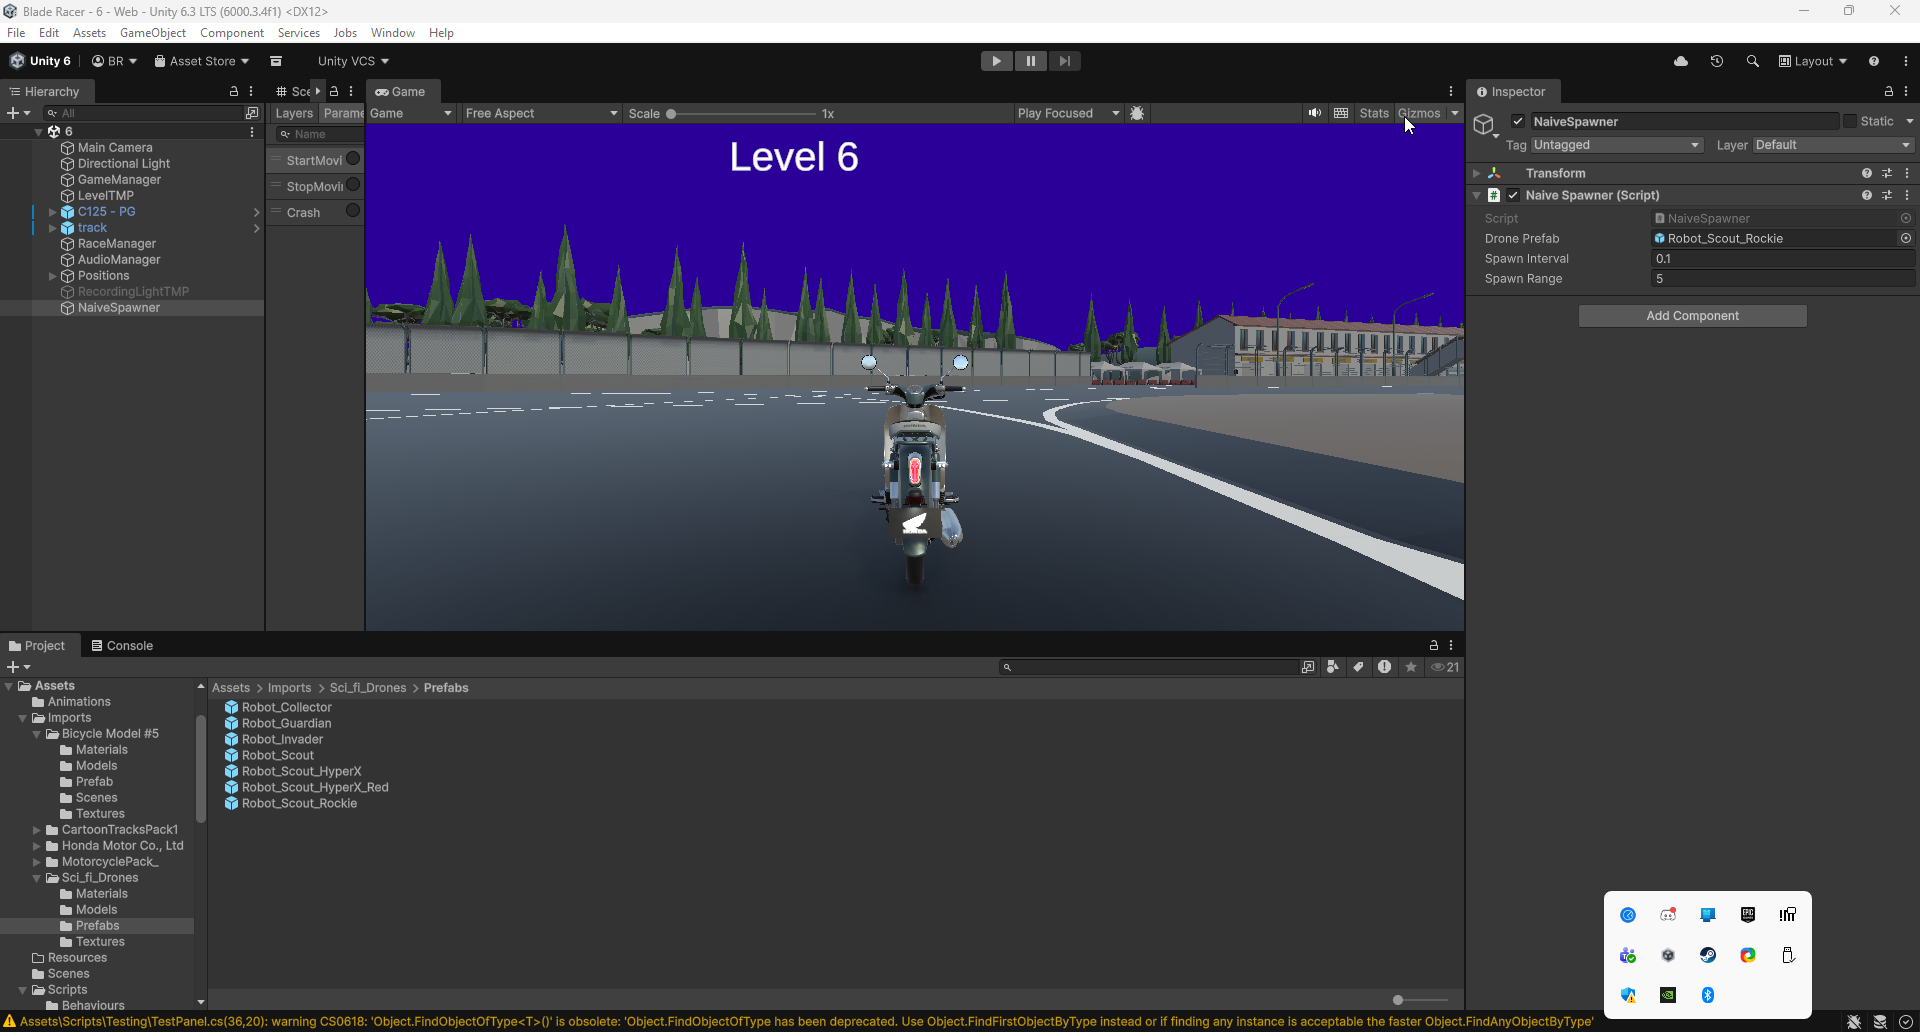
Non-Pooled Spawner: NaiveSpawner.cs
📁 File Structure Note - TESTING CODE
Create a new file: Assets/Scripts/Testing/NaiveSpawner.cs
A simple spawner that creates drones with Instantiate — no pool, no reuse.
⚠️ This is for your comparison scene only — not for production use.
Why This Is Expensive
Instantiate() - Every call allocates new memory: GameObject, Transform, MonoBehaviour, and all component data. At 10/sec, that's 10 heap allocations per second.
No callbacks - Unlike DroneSpawner, there's no OnGet/OnRelease/OnDestroy. No control over the object lifecycle at all.
spawnInterval = 0.1f - Spawns 10 drones/sec. Over 10 seconds that's 100 Instantiate() calls + 100 Destroy() calls = 200 expensive operations.
DroneSpawner:   pool.Get() → reuse existing object
NaiveSpawner:   Instantiate() → allocate new memory
The Profiler will show the cumulative cost of all these allocations.
Setting Up Scene A (No Pooling)
Scene A Setup Steps
- File → New Scene, save as SceneA_NoPool
- Create a Cube in the scene
- Add the NaiveDrone script to the Cube
- Drag the Cube into your Prefabs folder to make a prefab
- Delete the Cube from the scene (keep the prefab!)
- Create an empty GameObject, name it "NaiveSpawner"
- Attach NaiveSpawner script to it
- Drag your NaiveDrone prefab into the Drone Prefab field
- Set Spawn Interval to
0.1(10 drones/sec)
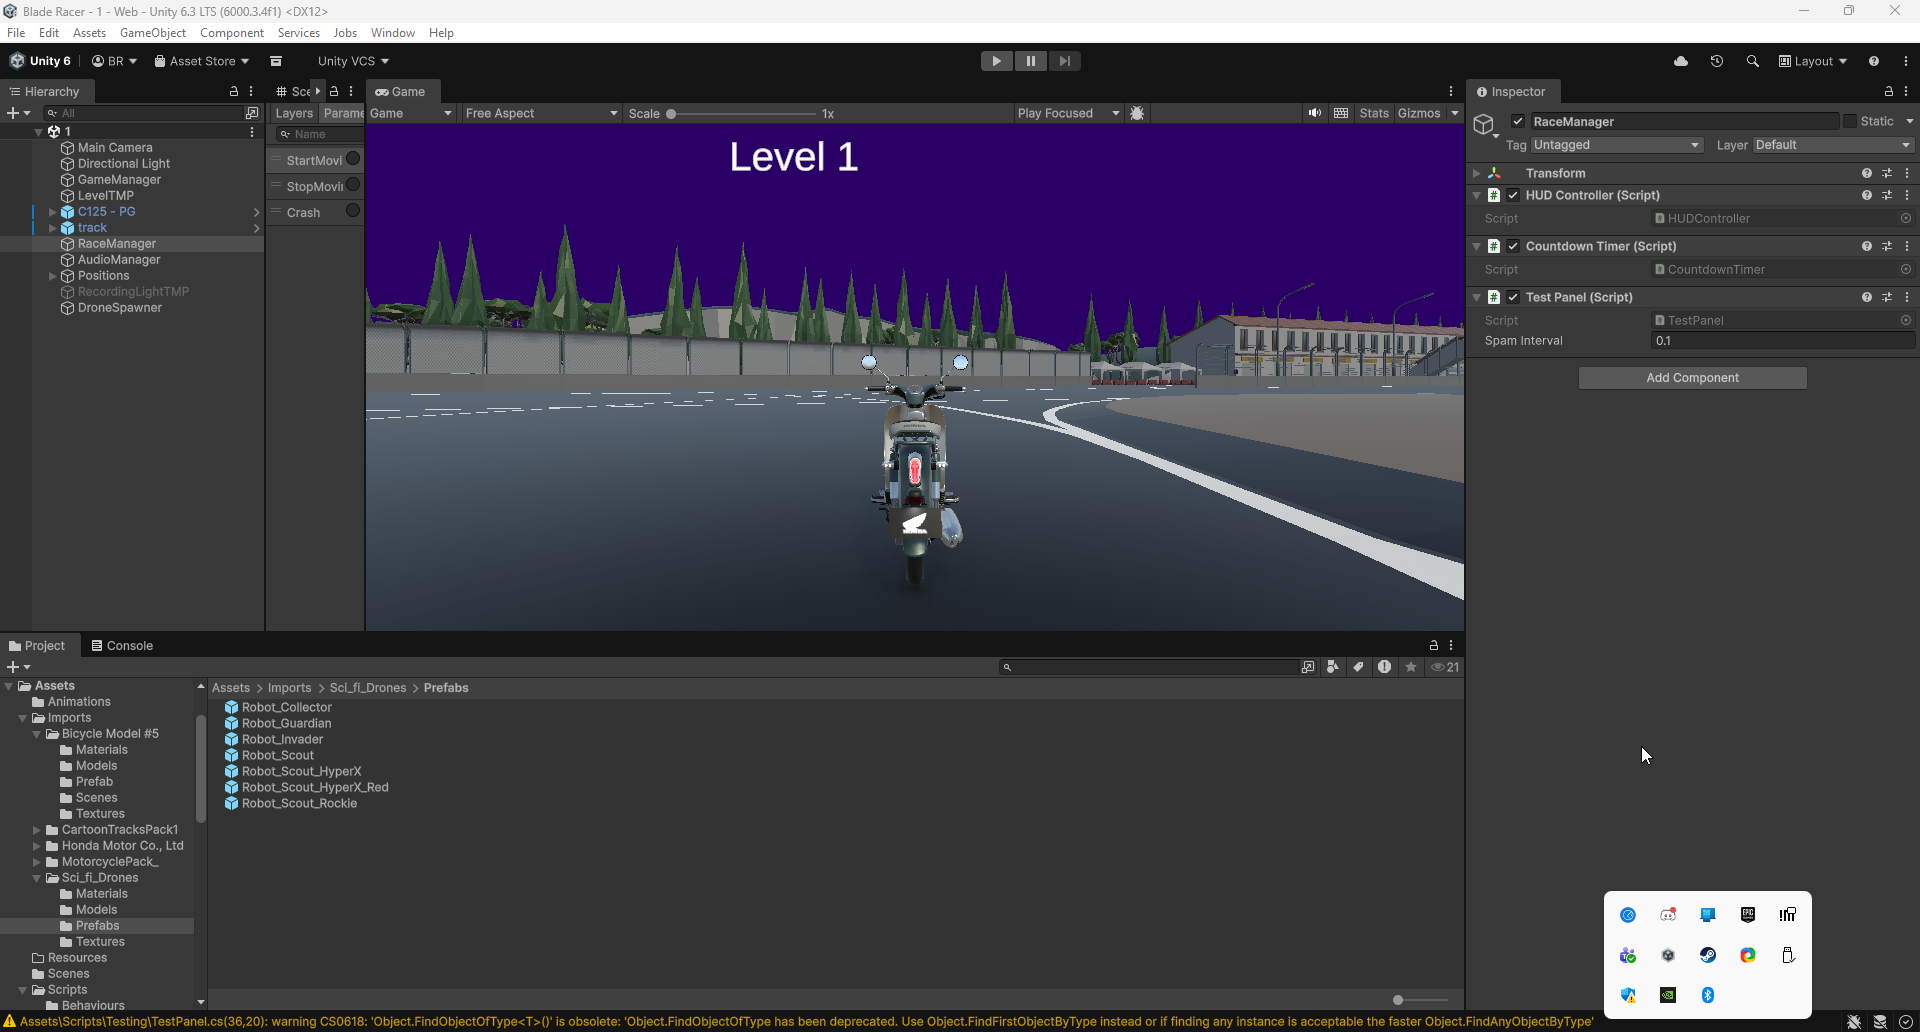
Setting Up Scene B (With Pooling)
You already have most of this from Part 1! Just verify everything is in place.
Scene B Setup Steps
- File → New Scene, save as SceneB_WithPool
- Add your Drone prefab (with the pooled Drone script)
- Create empty GameObject "DroneSpawner", attach DroneSpawner script
- Assign the Drone prefab to DroneSpawner's Drone Prefab field
- Verify TestPanel is in the scene with the Object Pool section
- In TestPanel, set Spawn Interval to
0.1(match Scene A!)
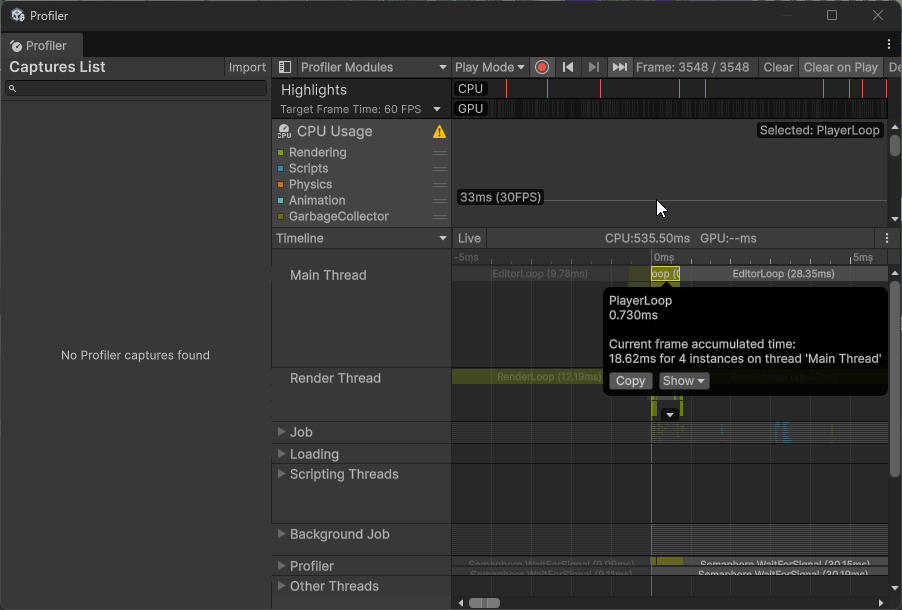
Unity Profiler: Getting Started
Opening the Profiler
Window → Analysis → Profiler (or press Ctrl+7 / Cmd+7)
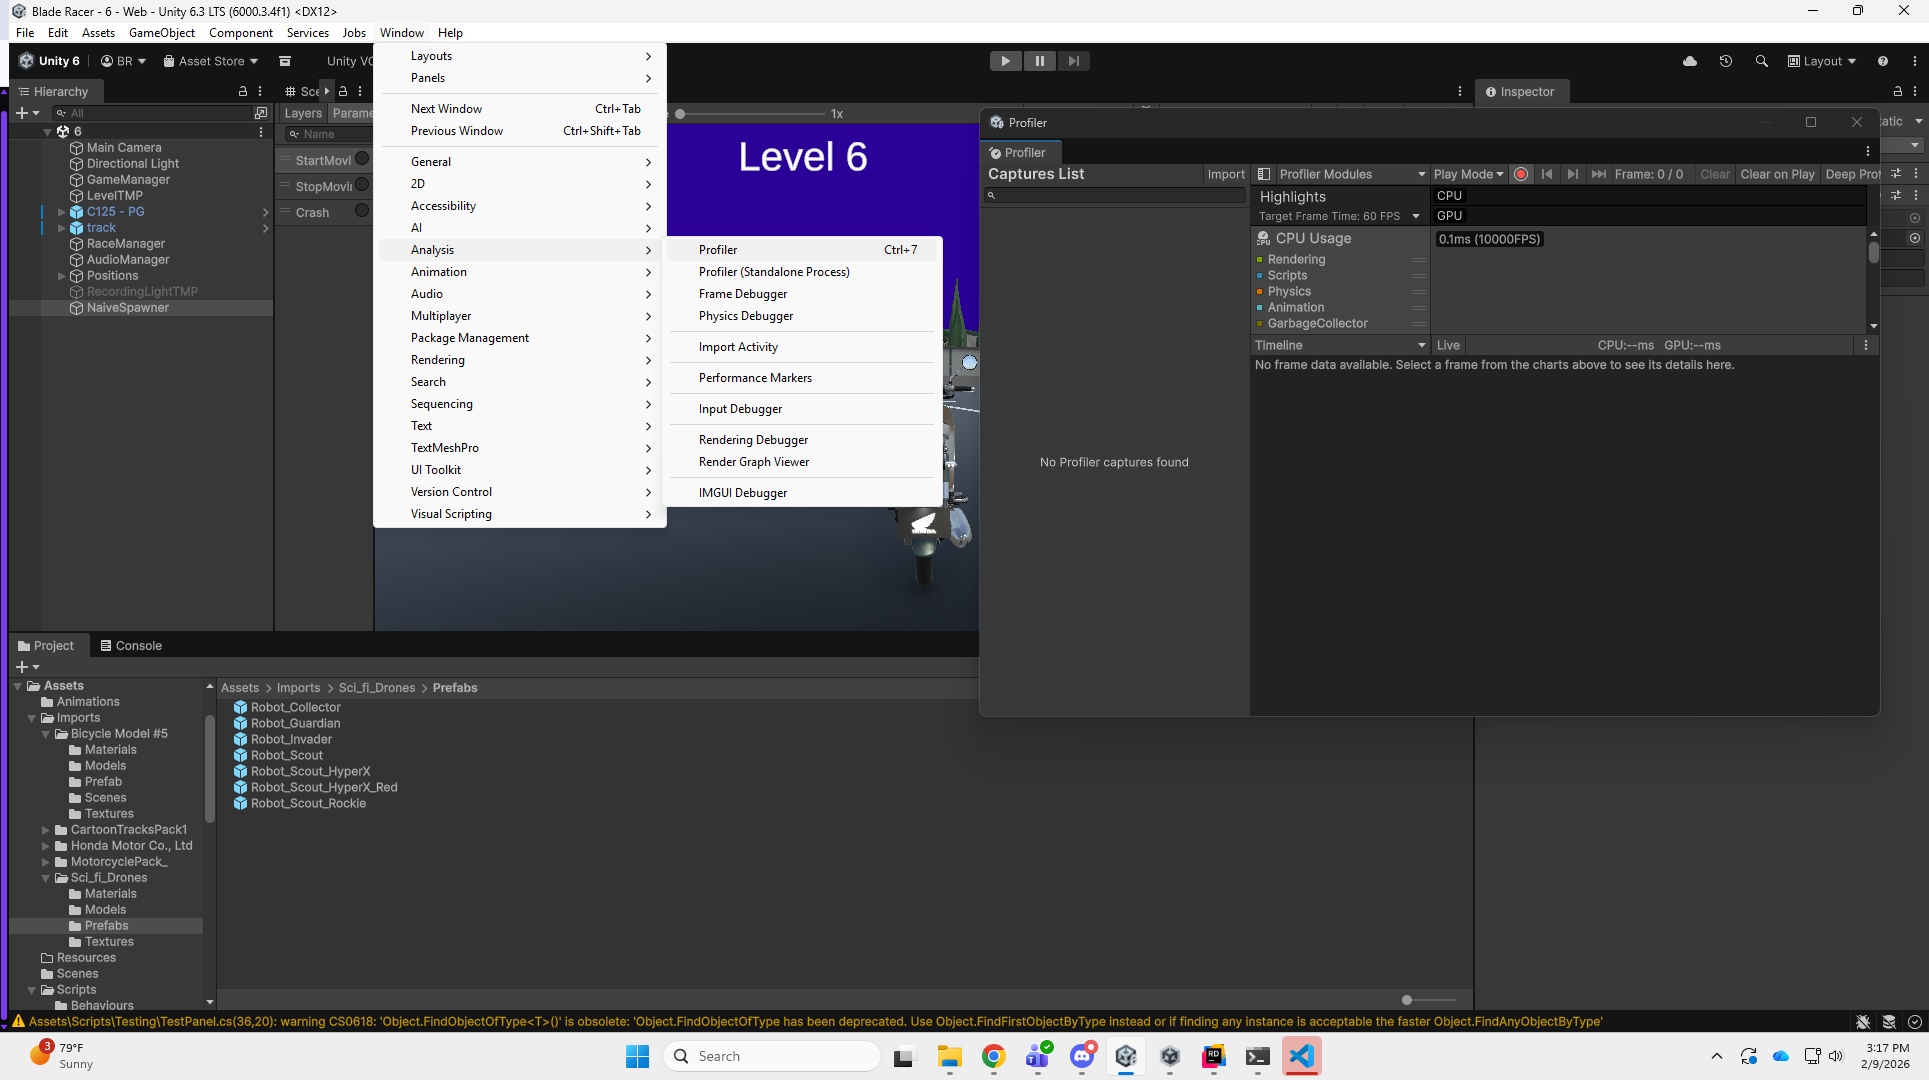
Key Controls
- Record button (red circle) - Start/stop recording
- Clear - Reset profiler data between tests
- Deep Profile - Leave OFF (too slow for this test)
- Click a frame in the timeline to see its details
Modules to Enable
- CPU Usage - Shows frame time and GC allocations
- Memory - Shows total memory and GC frequency
- The Hierarchy view (bottom panel) shows per-method details
- Look for the GC.Alloc column!
Running the Test & Reading Results
Test Procedure
- Open Scene A (No Pooling)
- Open the Profiler, click Clear, then Record
- Press Play and let it run for 30 seconds
- Stop playback, screenshot the Profiler timeline
- Repeat steps 1-4 for Scene B (With Pooling)
Scene A: No Pooling
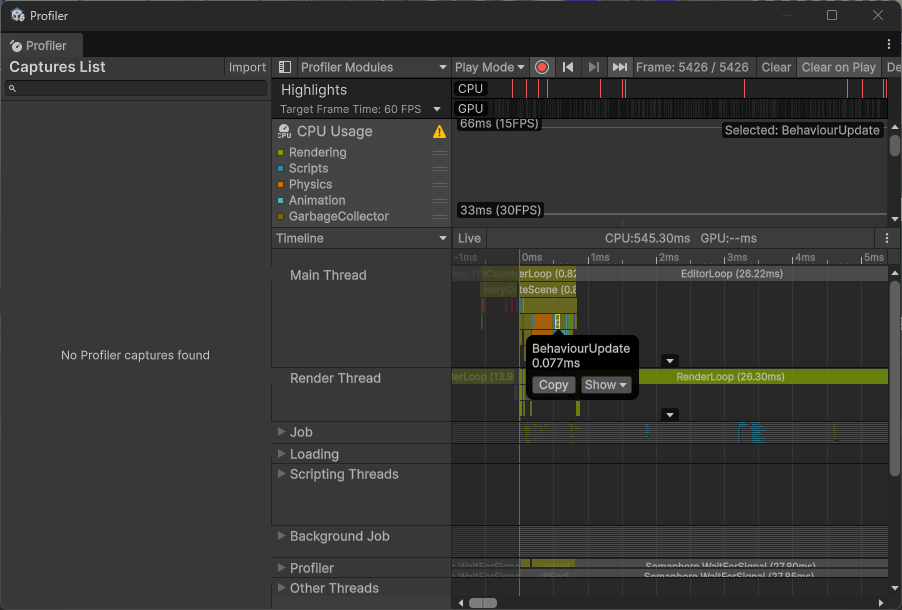
Look for: Irregular spikes in the timeline, high GC.Alloc values, inconsistent frame times
Scene B: With Pooling
Look for: Flat, consistent timeline, near-zero GC.Alloc, stable frame times
Homework Assignment 📝
Assignment: Drone Pool with Performance Testing
Due: Next class
Submission: Unity project + video to D2L
Part 1: Core Implementation (50 points)
- Implement Drone class with OnSpawn/OnDespawn + custom reset logic
- Implement DroneSpawner with Unity ObjectPool<Drone>
- Add all four pool callbacks with debug logs
- Add Object Pool section to TestPanel with auto-spawn (2 drones/sec)
- Display active/inactive pool counts in TestPanel GUI
Homework Assignment (Continued)
Part 2: Performance Comparison (50 points)
- Create Two Scenes:
- Scene A: WITHOUT pooling (Instantiate/Destroy)
- Scene B: WITH pooling (ObjectPool)
- Both scenes spawn 100 drones over 10 seconds
- Record performance metrics:
- Open Unity Profiler (Window → Analysis → Profiler)
- Record FPS average
- Record GC.Alloc count
- Take screenshots of Profiler CPU usage
- Document findings: Which scene performs better? By how much?
Optional Enhancement:
Implement pool warm-up that pre-creates 20 drones at Start() - great for eliminating first-spawn lag!
Video Submission Guidelines
Recording Checklist (3-5 minutes)
- Show Code: Briefly show Drone and DroneSpawner classes
- Show Scene Setup: Hierarchy and Inspector settings
- Test Scene A (No Pool):
- Show Profiler recording
- Run for 30 seconds
- Point out GC spikes in Profiler
- Test Scene B (With Pool):
- Show Profiler recording
- Run for 30 seconds
- Show smooth performance, no GC spikes
- Show GUI with pool statistics
- Compare Results: Side-by-side Profiler screenshots
- Narration: Explain the performance difference
Grading Rubric (100 points)
Point Breakdown
Additional Resources
📚 Further Reading
- Baron Chapter 8: Object Pool Pattern implementation
- Unity Manual: ObjectPool<T> API
- Unity Blog: Object Pooling Guide
- Game Programming Patterns: Object Pool
🔧 Tools
- Unity Profiler: Window → Analysis → Profiler
- Memory Profiler: Package Manager → Memory Profiler
- Frame Debugger: Window → Analysis → Frame Debugger
Questions & Discussion 💬
Open Floor
- How does garbage collection impact performance?
- When should I use object pooling?
- How do I determine optimal pool size?
- What's the difference between defaultCapacity and maxSize?
- How do I use the Unity Profiler?
- Homework clarifications?
Performance Optimized! ♻️
Today's Achievements:
- ✅ Understood GC performance problems
- ✅ Learned Object Pool Pattern structure
- ✅ Implemented Unity ObjectPool<T>
- ✅ Built reusable drone spawning system
- ✅ Measured performance improvements
Homework Due Next Class:
Drone Pool + Performance Comparison + Profiler Data
Video submission to D2L
Next: Observer Pattern for decoupled component communication! 👀