Managing Character States
The State Pattern 🎭
CSCI 3213 - Game Programming
From idle to action - managing entity behaviors!
Today's Content
📚 Based on Chapter 5
Managing Character States with the State Pattern
From: Game Development Patterns with Unity 2021 (2nd Edition)
By David Baron
Today's Learning Objectives
What We'll Master
- 🎯 Understand the State Pattern structure
- 🎯 Define character finite states
- 🎯 Implement State Pattern in C#
- 🎯 Recognize pattern limitations
- 🎯 Leverage Unity's Animation System FSM
Goal: Build a motorcycle controller with multiple states (Stop, Start, Turn, Crash) using the State pattern.
Developer's Note: "Never Panic Early"
⚠️ What to Expect During Implementation
As we implement this pattern, we'll be creating multiple files in a specific order. You will see errors in Unity and your IDE until all files are complete.
How to Handle Development Errors
- Don't Ignore: Note the errors - they're telling you something
- Don't Panic: These are expected until all files are created
- Stay Calm: Follow the implementation order and errors will resolve
As Apollo 13's Fred Haise said: "Never Panic Early"
This is a critical skill for software development. Note problems, but stay focused on the implementation path.
The Problem: State Transitions
In Games, Entities Constantly Change States
- Enemy: Idle → Patrol → Chase → Attack → Death
- Player: Idle → Walk → Run → Jump → Fall → Land
- Vehicle: Stop → Start → Turn → Accelerate → Crash
- Door: Closed → Opening → Open → Closing
❌ Without State Pattern
Massive switch statements, bloated controller classes, behaviors scattered everywhere, difficult to add new states, impossible to maintain!
What is the State Pattern?
State Pattern
A behavioral pattern that allows an object to alter its behavior when its internal state changes.
✅ Key Concept
Encapsulate state-specific behaviors into separate classes. The object appears to change its class when it changes state.
State Pattern Structure
Core Participants
• Defines interface for clients to request state changes
• Holds pointer to current state
• Example: BikeStateContext
• Establishes contract for concrete states
• Defines Handle() method
• Example: IBikeState
• Implement IState interface
• Contain state-specific behavior
• Example: BikeStartState, BikeStopState, BikeTurnState
State Pattern UML Diagram
┌─────────────────────┐
│   BikeController    │  ← Client
│─────────────────────│
│ + StartBike()       │
│ + StopBike()        │
│ + Turn()            │
└──────────┬──────────┘
           │ uses
           ▼
┌─────────────────────┐         ┌──────────────┐
│ BikeStateContext    │────────▶│  IBikeState  │  ← Interface
│─────────────────────│         │──────────────│
│ - currentState      │         │ + Handle()   │
│ + Transition()      │         └──────┬───────┘
└─────────────────────┘                │
                                       │ implements
              ┌────────────────────────┼────────────────────┐
              ▼                        ▼                    ▼
     ┌────────────────┐      ┌────────────────┐  ┌────────────────┐
     │ BikeStopState  │      │ BikeStartState │  │ BikeTurnState  │
     │────────────────│      │────────────────│  │────────────────│
     │ + Handle()     │      │ + Handle()     │  │ + Handle()     │
     └────────────────┘      └────────────────┘  └────────────────┘
Defining Character States
Our Racing Motorcycle
Finite States for Blade Racer Bike
These are the discrete states our motorcycle can be in at any given moment. Each state has specific behaviors and animations.
State Behavior Definitions
🛑 STOP State
- Speed: Zero
- Gears: Neutral
- Animation: Engine idle (chassis vibrating)
- Input: Can transition to START
▶️ START State
- Speed: Max speed
- Movement: Forward motion
- Animation: Wheels turning
- Input: Can TURN or STOP
🔄 TURN State
- Direction: Left or Right
- Movement: Lateral shift
- Animation: Bike tilting
- Input: Return to START
💥 CRASH State
- Speed: Decelerating
- State: On fire, on side
- Animation: Crash sequence
- Input: No longer responds
Knowledge Check: State Pattern
Click each card to reveal the answer!
❓ Question 1
Why use the State Pattern instead of a large if/else or switch statement to handle bike behavior?
Answer: The State Pattern encapsulates each state's behavior into separate classes, making code easier to maintain and extend. Adding a new state (like "BOOST" or "DRIFT") just means creating a new class—no need to modify existing code. With if/else, every new state requires editing a massive conditional block across multiple methods, risking bugs and making the code harder to understand.
❓ Question 2
The bike has four states: STOP, START, TURN, and CRASH. How does the BikeController know which state it's currently in?
Answer: The BikeController maintains a reference to the current state (usually a private field like _currentState of type IBikeState). When the bike needs to change states, it calls a method like TransitionToState(newState) which updates this reference. The context (BikeController) delegates behavior to whatever state object is currently stored in that field.
❓ Question 3
Looking at our FSM diagram, what should happen if the bike tries to TURN while in the STOP state?
Answer: According to the FSM diagram, there's no valid transition from STOP to TURN. The state should reject this transition (do nothing, log a warning, or throw an error). The bike must first transition to START, then it can TURN. This prevents invalid behavior like turning while stationary. Good state implementations validate transitions and only allow moves shown in the FSM diagram.
❓ Question 4
In the CRASH state, animations play and the bike no longer responds to input. Why is this behavior encapsulated in the state itself rather than in the BikeController?
Answer: Each state knows its own behavior best. The CRASH state encapsulates crash-specific logic (play explosion animation, ignore input, decelerate). If we put this in BikeController, we'd need if/else checks everywhere: "if crashing, ignore this input; if crashing, play this animation." By encapsulating it in the state, the BikeController can simply call _currentState.HandleInput() and trust the state to do the right thing. This is the Single Responsibility Principle in action!
Implementation Step 1: Interface
📁 File Structure Note
Create a new file: Assets/Scripts/Patterns/State/IBikeState.cs
This interface defines the contract that all bike states must follow.
How This Works
IBikeState Interface: All concrete states (Stop, Start, Turn, Crash) will implement this interface.
Handle() Method: Each state implements its own behavior here. We pass in BikeController so states can access bike properties (speed, direction, etc.).
BikeController because we haven't defined it yet. We'll create
it in Step 3. The red lines will disappear then!
Design Note: This is a Unity-adapted approach - we pass the controller reference to each Handle() call rather than storing it permanently.
Implementation Step 2: Context
📁 File Structure Note
Create a new file: Assets/Scripts/Patterns/State/BikeStateContext.cs
This class manages state transitions and holds the current state.
How This Works
BikeStateContext: The "context" class that manages state transitions. It knows the current state and can switch between states.
Why readonly? The _bikeController is marked readonly
because once we set it in the constructor, it should never change. The bike controller
reference stays the same for the entire lifetime of this context.
Note: readonly means the field can only be assigned in the
constructor or at declaration. This prevents bugs where we accidentally reassign it later.
Two Transition Methods: We have two methods both named Transition
- this is called method overloading in C#. One takes no parameters and
re-triggers the current state. The other takes an IBikeState parameter, switches to that
new state, AND triggers it.
C# Feature: Overloading allows multiple methods with the same name but different parameters. The compiler picks the right one based on what arguments you pass!
Implementation Step 3: Controller
📁 File Structure Note
Create a new file: Assets/Scripts/Controllers/BikeController.cs
This is the main controller that uses the State pattern to manage bike behavior.
How This Works
BikeController: This is the MonoBehaviour that gets attached to the bike GameObject. It's the main entry point for controlling the bike.
Start() Method: Creates the context and all state objects, then sets the initial state to STOP.
The 'this' Keyword: When we call new BikeStateContext(this),
the this keyword refers to the current BikeController instance. We're
passing a reference to "myself" so the context knows which bike it's managing!
C# Tip: this is a reference to the current object. Inside
BikeController, this means "this BikeController object."
AddComponent<T>(): Unity's way of adding scripts as components. Each state becomes a MonoBehaviour on the same GameObject!
Public Methods: Other scripts call StartBike(),
StopBike(), or Turn() to change the bike's state.
These methods delegate to the context.
Game Flow: When player presses W, some input script calls
BikeController.StartBike(), which transitions to the START state!
Implementation Step 4: Stop State
📁 File Structure Note
Create a new file: Assets/Scripts/Patterns/State/BikeStopState.cs
This is a concrete state that implements the STOP behavior.
How This Works
BikeStopState: The STOP state behavior encapsulated in a class. This is a MonoBehaviour that implements IBikeState.
Handle() Method: Called when bike transitions to STOP state. Sets speed to zero - that's all STOP does!
Caching Reference: We cache _bikeController on first call
so we don't have to pass it every frame. Unity pattern optimization.
In a full game: This would also trigger idle animations, play engine idle sound, reset gears to neutral, etc. All STOP-specific behavior lives here!
Implementation Step 5: Start State
📁 File Structure Note
Create a new file: Assets/Scripts/Patterns/State/BikeStartState.cs
This is a concrete state that implements the START/MOVE behavior.
How This Works
BikeStartState: The START state makes the bike move forward at max speed. Two key methods here!
Handle(): Sets the bike's speed to maximum when entering START state. This is the state transition behavior.
Update(): Runs every frame while in START state! Moves the bike forward continuously. This is why the bike keeps moving - Update() is always running for this MonoBehaviour.
State Power: Each state controls its own Update() loop! STOP state doesn't move, START state moves forward, TURN state handles lateral movement.
Implementation Step 6: Turn State
📁 File Structure Note
Create a new file: Assets/Scripts/Patterns/State/BikeTurnState.cs
This is a concrete state that implements the TURN behavior.
Direction.cs (enum file)
How This Works
BikeTurnState: Handles lateral movement (left/right). More complex than STOP or START!
Direction Enum: Left = -1, Right = 1. Cast to float for Vector3.x. Negative moves left, positive moves right.
Safety Check: Only turn if CurrentSpeed > 0.
Can't turn while stopped - just like real bikes!
Translate(): Moves the transform laterally by
turnDistance. Instant lane change!
Design Pattern: TURN state knows turning rules. If we wanted gradual turning, we'd update the logic here only - nowhere else!
Test Client Script
📁 File Structure Note - TESTING CODE
Create a new file: Assets/Scripts/Testing/ClientState.cs
This is a temporary test script that creates GUI buttons to manually trigger state transitions.
⚠️ This is for testing only - you can delete it once you've verified the State pattern works!
How This Works
ClientState: A simple test script that creates GUI buttons to manually trigger state transitions.
FindFirstObjectByType<T>(): Unity 6 method that searches the entire scene for an object of type T. Returns the first one it finds.
Unity 6 Update: This replaces the old
FindObjectOfType(typeof(BikeController)) pattern.
The new generic version is cleaner - no casting needed! The type is
specified in angle brackets <BikeController>.
C# Generics: The <BikeController> tells the method
exactly what type to find and return. Type-safe and no casting required!
OnGUI(): Unity's old GUI system. Runs every frame to draw buttons. Clicking buttons calls BikeController methods.
OnGUI() with all caps "GUI" -
not OnGui() or onGUI(). Unity won't call your method if the
spelling/capitalization is wrong, and you won't get an error message - it just
silently doesn't work! No buttons will appear.
TestPanel.cs to combine all test controls into one draggable window.
See the Event Bus lecture for the unified TestPanel implementation.
Testing the State Pattern
Test Setup Steps
- Create new Unity scene
- Add 3D Cube GameObject (visible to camera)
- Attach BikeController script to cube
- Attach ClientState test script to cube (or any GameObject)
- Play and use GUI buttons to test states
Hands-On Practice 💻
40-Minute Implementation Challenge
Implement the State Pattern for the bike:
- Create IBikeState interface
- Create BikeStateContext class
- Create BikeController MonoBehaviour
- Implement BikeStopState, BikeStartState, BikeTurnState
- Create Direction enum
- Create ClientState test script
- Test in Unity with GUI buttons
Gaming History Moment 🕹️
Sega vs Nintendo: The Console Wars (1989-1995)
In 1991, Sega needed a mascot to rival Mario. They created Sonic the Hedgehog, designed around one core concept: speed. Sonic wasn't just fast - he had distinct states that emphasized velocity and attitude. Unlike Mario's simple run and jump, Sonic had idle tapping his foot impatiently, revving up in a spin dash, blazing through loops at top speed, and tumbling when hit.
Each state had unique animations, physics, and behaviors. The transition from standing still to spin dash to full-speed running created a sense of momentum and power. Sega's "Genesis does what Nintendon't" campaign emphasized Sonic's speed states - this wasn't your father's platformer!
Connection to State Pattern
Sonic's character controller is a perfect example of the State Pattern in action! Idle, Spin Dash, Running, Jump, Roll, Hit - each state has specific physics, animations, and allowed transitions. Just like our bike states (STOP, START, TURN), Sonic's states encapsulate behaviors: you can't spin dash while running, you can't run while in the air. The State Pattern enables complex character behavior with clean, manageable code!
Benefits of the State Pattern
✅ Encapsulation
State-specific behaviors are isolated in their own classes. No giant switch statements!
✅ Maintainability
Easy to add new states without modifying existing code. Open/Closed Principle!
✅ Clarity
Each state class has a single responsibility. Clear, focused code!
✅ Flexibility
States can be assigned dynamically at runtime. Powerful composition!
Drawbacks & Limitations
⚠️ Limitation 1: Animation Blending
The State pattern doesn't provide built-in animation blending. Transitioning from idle → walk → run requires smooth visual blending, which needs extra code.
⚠️ Limitation 2: Complex Transitions
Defining relationships and conditions between states (state diagrams) requires significant boilerplate code. Example: "Can only transition to Run from Walk, not from Idle."
⚠️ Limitation 3: Many Classes
Complex characters with many states = many classes to manage.
Unity's Built-In Solution
Unity Animation System
Unity's animation system IS a Finite State Machine (FSM) with:
- ✓ Visual State Editor - Drag and drop states
- ✓ Animation Blending - Smooth transitions built-in
- ✓ Transition Conditions - Set up rules visually
- ✓ State Behaviors - Attach scripts to states
- ✓ Parameters & Triggers - Control flow from code
Best of Both Worlds: Use State pattern concepts with Unity's visual tools!
Unity Animator Controller
Visual State Machine Editor
    ┌──────────┐
    │   Idle   │ ────────────┐
    └──────────┘             │ speed > 0.1
         ▲                   ▼
         │              ┌──────────┐
         │ speed < 0.1  │   Walk   │
         │              └──────────┘
         │                   │
         │                   │ speed > 5.0
         │                   ▼
         │              ┌──────────┐
         └──────────────│   Run    │
                        └──────────┘
Rectangles = Animation States
Arrows = Transitions with conditions
State Pattern vs Unity Animator
Use State Pattern For:
- Non-animated state machines
- Game logic states (menu systems)
- AI decision states
- Abstract state systems
- Learning and understanding FSM
Use Unity Animator For:
- Character animations
- Complex animation blending
- Visual state transitions
- Mechanical animations (doors, etc.)
- Production-ready animation
For Blade Racer: We'll use State Pattern for game logic and Unity Animator for bike/character animations!
Alternative & Related Patterns
🌳 Behavior Trees
For complex AI with dynamic decision-making. Tree of actions evaluated each frame.
Use for: NPC AI, enemy behaviors
📋 Blackboard Pattern
Shared knowledge repository for AI agents. Works well with Behavior Trees.
Use for: AI data sharing
⚙️ FSM (Pure)
More focused on transitions and input triggers than State Pattern. Automaton-like.
Use for: Game state machines
💾 Memento Pattern
Like State Pattern but with undo/rollback capability. Saves state history.
Use for: Undo systems, time rewind
Homework Assignment 📝
Assignment: State Pattern Implementation
Due: Next class
Submission: Unity project + video to D2L
Part 1: Code Implementation (60 points)
- Implement complete State Pattern (all classes from today)
- Add a 4th state: CrashState
- Logs "Bike crashed!"
- Sets speed to zero
- Disables further state transitions
- Add keyboard controls in ClientState:
- Space = Start, S = Stop
- Left Arrow = Turn Left, Right Arrow = Turn Right
- C = Crash
Unity Animator Controller 🎬
What is Unity Animator?
Unity's Animator Controller is a visual tool for managing state machines and animations. It provides a node-based interface for creating FSMs without writing all the state transition code manually.
✅ Advantages
- Visual state machine editor
- Built-in animation blending
- Easy to modify transitions
- Inspector-friendly parameters
⚠️ Limitations
- Less flexible than code
- Designed primarily for animation
- Can become complex quickly
- Harder to debug than State Pattern
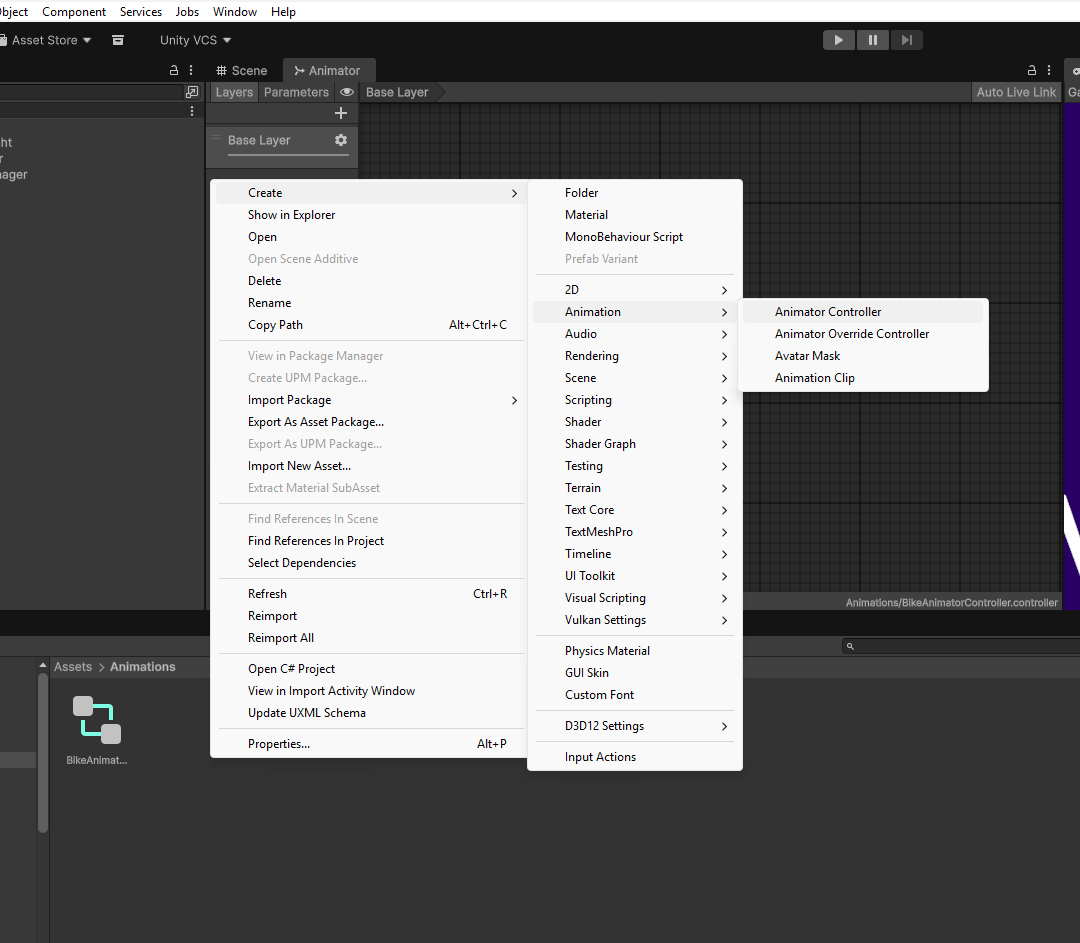
Step 1: Create Animator Controller
Creating Your First Animator Controller
- In Project window: Right-click in Assets folder
- Select
Create → Animator Controller - Name it
BikeAnimatorController - Double-click to open Animator window
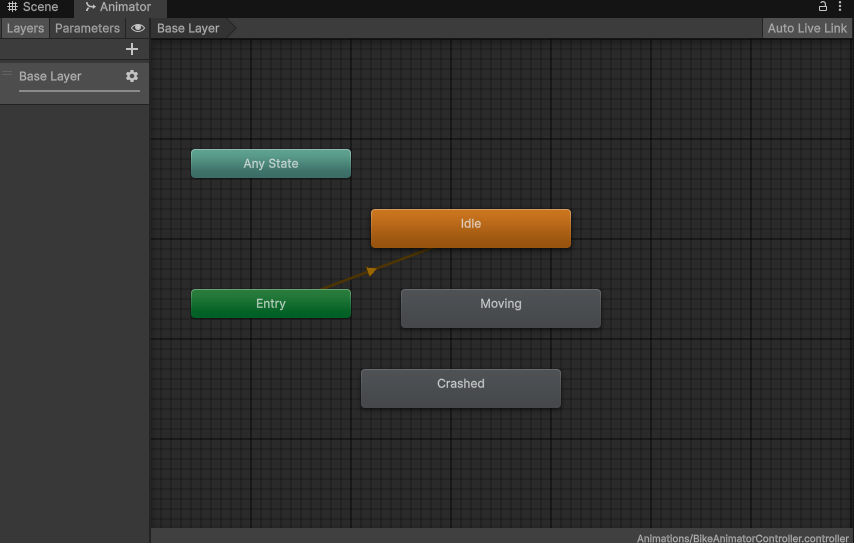
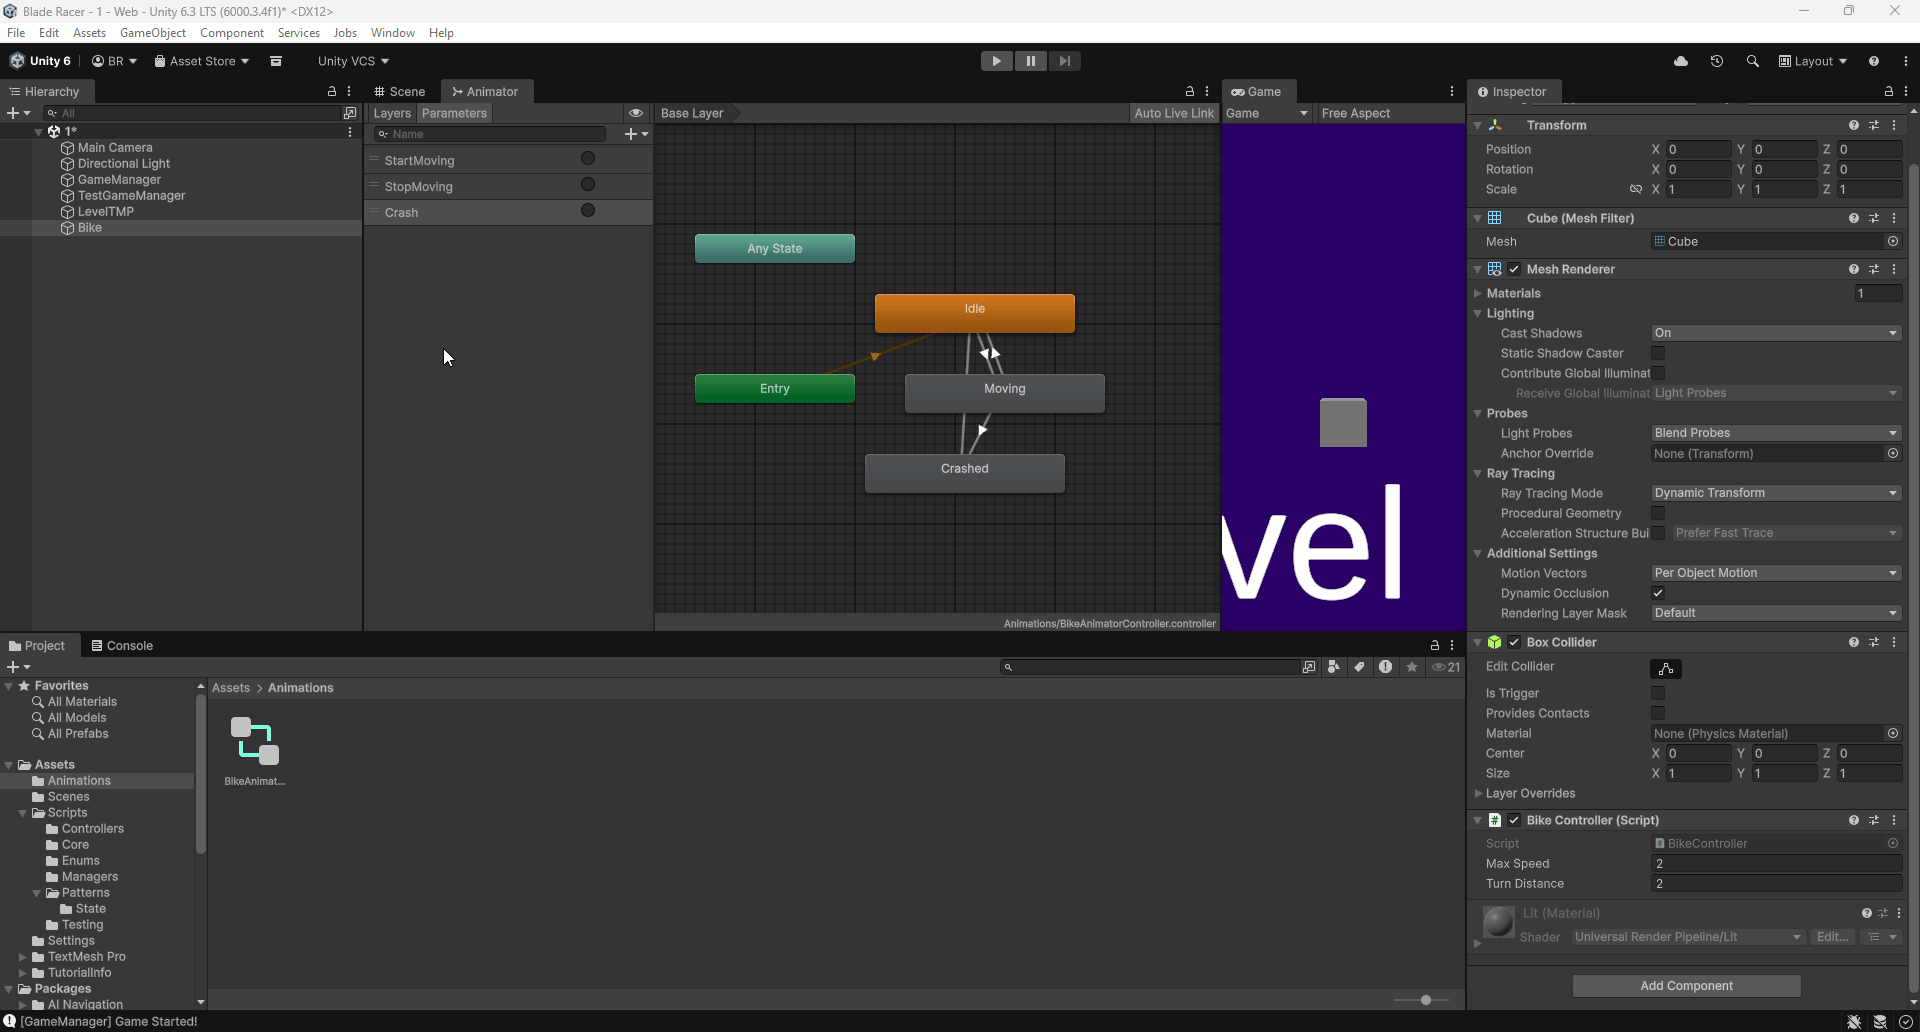
Step 2: Add States to Animator
Creating States in the Animator Window
- In Animator window: Right-click on grid
- Select
Create State → Empty - Rename to
Idle(this will be your default state) - Repeat to create
MovingandCrashedstates
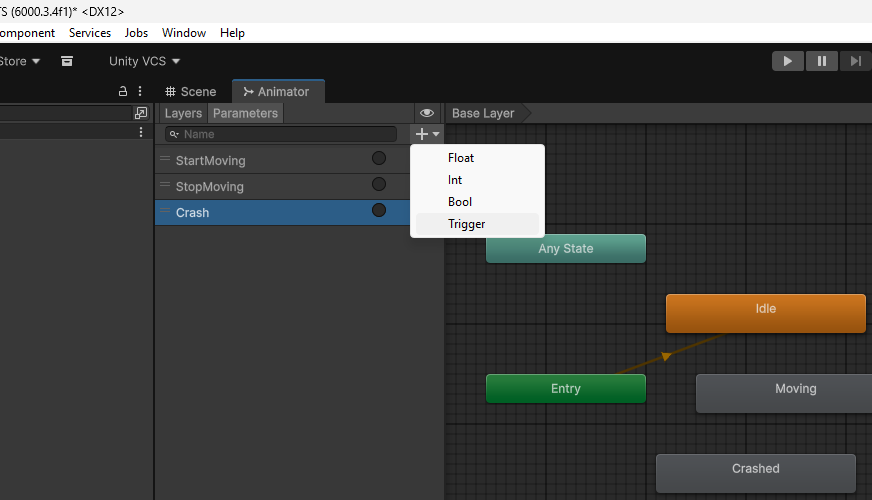
Step 3: Add Parameters
Creating Animator Parameters
Parameters are variables that control state transitions. We'll use Triggers which are one-time events that fire transitions.
- In Animator window: Find Parameters tab (top-left)
- Click the
+button - Select
Triggertype - Create these triggers:
StartMovingStopMovingCrash
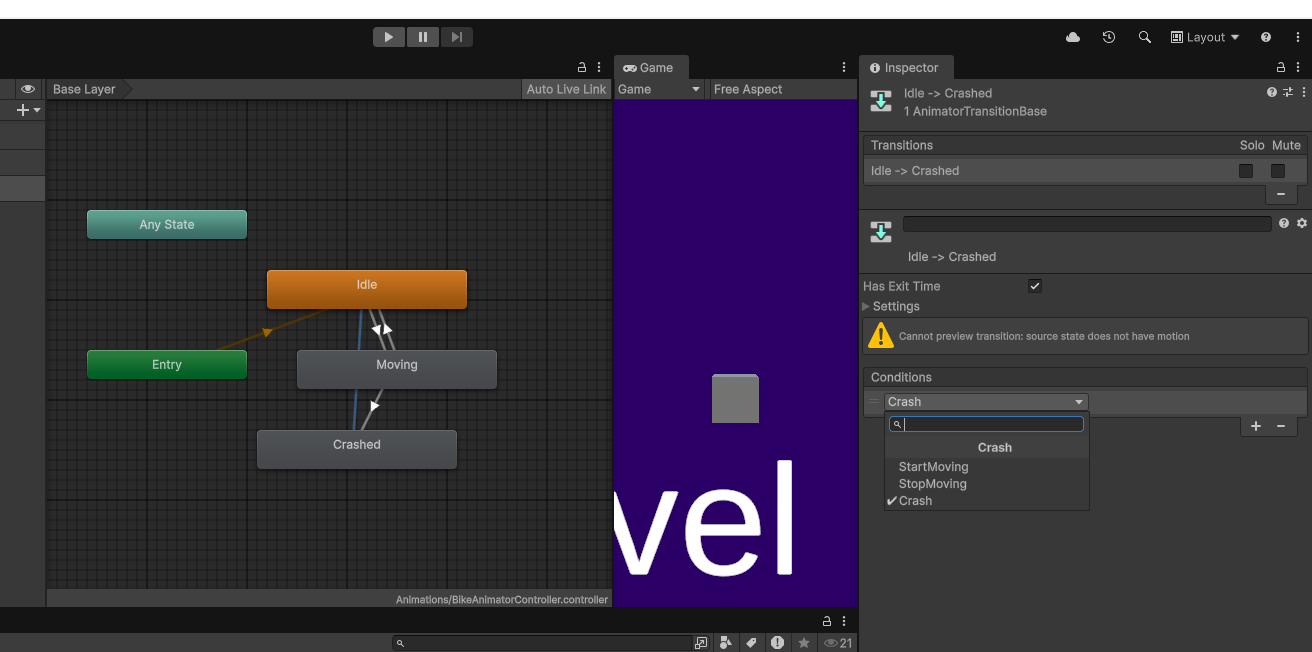
Step 4: Create Transitions
Connecting States with Transitions
Creating a Transition:
- Right-click on Idle state
- Select
Make Transition - Click on Moving state to connect them
- Click the transition arrow to select it
- In Inspector: Click
+under Conditions - Set condition to
StartMovingtrigger
- Idle → Moving (condition: StartMoving)
- Moving → Idle (condition: StopMoving)
- Moving → Crashed (condition: Crash)
- Idle → Crashed (condition: Crash)
Step 5: Attach to GameObject
Adding Animator to Your Bike
- Select your Bike GameObject in Hierarchy
- In Inspector: Click
Add Component - Search for and add
Animatorcomponent - Drag
BikeAnimatorControllerinto the Controller slot
Animator component,
NOT the Animation component. They are different!
Step 6: Trigger States from Code
📁 File Structure Note
Update existing file: Assets/Scripts/Controllers/BikeController.cs
Add Animator integration to connect the State Pattern with Unity's Animator Controller.
Highlighted lines show the code to add.
animator.SetTrigger("TriggerName") fires the trigger
and causes the Animator to transition if conditions are met.
Step 7: Add Visual Feedback (Optional)
📁 File Structure Note - OPTIONAL
Create new file: Assets/Scripts/Behaviours/IdleStateBehaviour.cs
This is optional visual feedback code for testing. Since we don't have animations yet,
StateMachineBehaviour lets us change colors when states activate.
StateMachineBehaviour (with "u"). The American spelling
StateMachineBehavior (without "u") will NOT work and cause errors!
To Add to a State:
- Click on a state in Animator window
- In Inspector: Click
Add Behaviour - Create script (e.g.,
IdleStateBehaviour) - Repeat for Moving (blue) and Crashed (red) states
Homework Assignment (Continued)
Part 2: Unity Animator Exploration (40 points)
- Create a simple Animator Controller with 3 states:
- Idle, Moving, Crashed
- Set up transitions between states with parameters
- Attach to your bike GameObject
- Add color changes or simple animations to visualize states
- Trigger animator from BikeController code
Video Requirements:
- 2-5 minutes showing both implementations
- Demonstrate all states transitioning
- Show Unity Animator window with your FSM
- Brief narration explaining your implementation
Grading Rubric (100 points)
Point Breakdown
Additional Resources
📚 Further Reading
- Baron Chapter 5: Complete State Pattern details
- Unity Manual: Animation System
- Unity Learn: Animation Controllers
- Game Programming Patterns: State Pattern
Questions & Discussion 💬
Open Floor
- State Pattern structure and implementation?
- When to use State Pattern vs Unity Animator?
- How to add the CrashState?
- Unity Animator setup questions?
- Homework clarifications?
State Pattern Mastered! 🎭
Today's Achievements:
- ✅ Understood State Pattern structure (Context, Interface, States)
- ✅ Defined bike finite states and behaviors
- ✅ Implemented State Pattern in Unity/C#
- ✅ Recognized pattern limitations
- ✅ Learned Unity Animator as FSM solution
Homework Due Next Class:
State Pattern + CrashState + Unity Animator
Video submission to D2L
Next: Event Bus Pattern for game-wide communication! 🎯